Showing posts with label old barn doors. Show all posts

Wednesday, September 11, 2019

Greetings!  
Yes, it's been awhile since my thoughts have graced this page.  I'm really here because a very dear friend of mine recently told me I kind of left everyone in the lurch with our Mullan 'adventure'.  I guess I never had a proper ending to the story. :) Well, recently the ending, such as it is, turned into another chapter. To make a long story short, after living in our Mullan, Idaho home 'Camp Dunmovin' (Not!) for 4 years, we decided to sell our home and make our permanent residence the small, quirky town of Ajo, Arizona.  

What was to be a short visit to see friends, who themselves had moved from Coeur d'Alene to Ajo several years ago, turned into an instant love affair with this little gem of a town in the middle of the beautiful Sonoran desert.  Neither of us would have ever considered ourselves 'desert people' before our first trip down there but the desert has a way of drawing you in. A large part of its beauty lies in its mystery. The view is endless and never the same. You are constantly surrounded by life, some of it visible, most of it not. The night skies are coal black, with the only 'visible' companions being the stars, which you can see in abundance.  It's the ones that aren't quite as visible that can give you the most pause for thought! 

Actually, I don't think the desert is a place for the faint of heart. :/ 

While we have been working on this new chapter for 2 years, we just sold our home here in Mullan in July.  Because the house itself was not the norm, we, and even our realtor, thought it would take a while to sell.  It didn't . . . and we were totally unprepared to have to move so quickly.  You know how it goes, the best laid plans . . .

When we designed and built our home, we wanted something for 'us'. We weren't worried about who would like it and whether we would be able to sell it in the future.  We thought that wouldn't be our problem. :)  We also wanted a house we would be comfortable leaving in the winter knowing the snow would be piling up all around it. There was no name for our type of house at the time we built it.  It was just a Pole Building finished off as a house.  Now, (as of July) there is an actual category in the Realtors Multiple Listings Guide called Shouse's.  Who wudda thunk it!

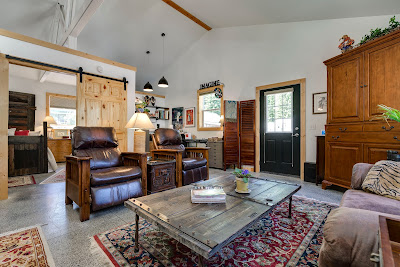
I'm just going to end here today with the photos of our 'Shouse' that our Realtor, Denise Lundy of Fortus Realty, had professionally taken for the listing.  After 4 years, this is how our 'Camp Dunmovin' evolved . . .


House, garage and our RV.  
(The house/garage actually fronts 3 streets)
The RV is our current 'home' until we get down to Ajo in November.


Living room looking into bedroom and office/studio space


Living room looking towards dining area and kitchen


Kitchen Island


Kitchen work area


Master bedroom (actually, the only bedroom!) with the bed made from recycled Barn doors


Master Bath


Next Blog I'll show you the start 
of our adventures at 
Camp Dunmovin 'South:)


Friday, May 8, 2015

AND NOW, FOR THE REST OF THE STORY ....

Welcome to the Kitchen.  I think I posted a photo of what we chose for our main Cabinet before, but maybe not.  I saw this somewhere so I can't take credit for the idea. This is a Stainless Steel Toolbox on Casters.  I just love the Kitchen drawer storage it gives us.  I looked at a lot of similar styles but decided on this one (Costco) because of size and the fact that it has both drawers and a Cabinet.


The drawers are perfect depth for so many of those 'odd shaped' Kitchen items.


One of the 'extras' we knew we wanted was a pot filler.  No more lifting a big heavy pot with water from Sink to Stove.  The convenience is all right there.   That's the funny looking thing you see there on the counter.  It just has a cold water connection which is all you need.


Our Coffee Pot is on this counter and so it's very convenient for filling that to make coffee too.  And, with the amount of coffee the two of us drink, that's major!  :)


I opted for mostly open shelving in the Kitchen. First and foremost, I like the look.  And second, I wanted the Kitchen to be convenient.  The truth is we're not getting any younger, (well ... Glen's not :) and to have things easily accessible just makes sense.  The non-open cabinets are Hickory Cabinets, the same as what we have in the main bathroom.


This is the Kitchen Island now finished.  Our friendly little Pig on the counter usually holds notes from our Grandchildren.  When they come to visit, one of them will usually write a 'love note' on it to us.  But, before the day ends, that note can be changed 3 or 4 times by another one of the Grandchildren.  It's become somewhat of a contest as to whose note will be the last one on there when they leave.  :)


sorry, this is a little dark.  This our Buffet and it is directly across from the Island.  


These shelves are to the left of the Buffet and pretty much in the center of the room.  I opted to do our wall this way because I wanted the whole open space to flow from one area to the other fairly seamlessly.  


Here's another view ...


The diningroom table.  This is one of those things that (hopefully!) will get changed  at some point.   It's a great table, it opens up to double in size, but for this space I think a narrow Farm table would be better.  I'm working on that!  :)


Now we are in the Livingroom area.  Yes, the Binoculars are always there.  Out that window we have a great view of the Mountains on the other side of Mullan.  Almost daily we can watch the Elk and Deer grazing on the hillside.  


More Livingroom area.  The Sofa is probably going to get changed at some point too.  It's soooo comfortable but we are probably going to replace it with a Sofa bed at some point.  We don't have a guest room per se, (just our RV 'guest house')  but we've had so much company since being here that we could occasionally use an extra bed.


In case you noticed, yes, I did change the big painting.
The Winter trees are what is up there now.  :)


We have two of these Brown Leather chairs (at the bottom of the photo below) that face across the livingroom to the window (with the binoculars)  For some reason I didn't get a full photo of this side.

That's my Studio space.  YES ... IT IS TINY.  :/  It was suppose to originally be our Office Space and we were going to build a separate Studio Space for me in the back yard.  The house was first priority though, so we said 'Next year' for the Studio and I would just carve out a niche 'somewhere' in the house for now.  Well, the 'Office' actually fit nicely in our Bedroom so I took over this space.  Temporarily. :)  But, other than storage for the non-daily essentials (frames, extra canvases, etc.) this works out just fine.  It is somewhast cramped right now, but I will probably only be designing Jewelry through the end of this year.  Once I stop that and just concentrate on my Artwork, this space will actually be perfect for my needs.   And, the coffee pot is just a few feet away!  :)  


Well, that is where we are at the moment.  There is still a lot of fine tuning to do inside.  But, since the weather is becoming nicer, the priority for now is the outside and the Garage (which needs a whole new makeover!)   Could almost be another whole Blog.  NOT!  :)


"THE ORNAMENT OF A HOUSE IS THE FRIENDS WHO VISIT IT."
                    Ralph Waldo Emerson


Will keep you 'posted' !
Charleen


Monday, April 27, 2015

WOW!! WE'RE IN . . . AND IT'S COZY.

I guess that can be taken two ways.  One ... it's just small and the other is ... it's just cozy.  :)  While it is a lot smaller than what we have been use to, I have to say that, overall, I'm not missing all the extra space (and the extra cleaning and maintaining).  At 1000 square feet it seems to fit most all of our needs.  My studio space could be a little bigger but then, in all honesty, no matter how big my studio was, it wouldn't be big enough!  :)  Most people coming in for the first time are surprised at how big the space does feel.  The high ceilings and open concept seem to have done their jobs.  I think we do have a few friends who have been in our past homes and are maybe not quite as enamored as we are, but ...

I would have been back sooner but I needed to get serious about my own work and get my studio organized (somewhat) so I could meet a big deadline that I had coming up.  That deadline is now behind me so I can now think about a few other things.  :)  Since a LOT has been accomplished in the last two and a half months I'm not even sure where to start. Let's see. How about the main Bathroom ...  

We'll start with the bad news.  If you remember, we used Pennies for the shower floor.  Well, when done laying all the pennies I went to the store and SPECIFICALLY told the Hardware 'EXPERT' what I was doing and that I needed a waterproof sealer to put over the pennies.  Long story short ... he sold me the wrong product.  What do I know?!  Within a week after installation the whole floor started turning white.  The finish he sold me was NOT waterproof.   Below is Glen having to scrape off the whole finish . . .


You can see the design from the pennies embedded into the scraped off finish below ...  :(


The shower now has a Resin finish over the pennies which is what should have been on there in the first place.  Major work.  Major aggravation.  Major want to pop someone in the nose.  


You can see the old, small barn door we cleaned, varnished and used between our sinks and the toilet.  It's fun. It just adds that bit of whimsy you so often look for.  


We opted for what are called 'Farm Sinks' for our bathroom.  Part of the bowl sits below the sink and the other half rests on the counter.  I had a friend ask if this was to give us more room under the sink in the cabinet.  The answer is no as these are nice sized sinks so nothing is gained under the counter.  I was going for 'the look.'  :)


Toilet in the above photo is just to the left of this door.  This is one of our New Barn Doors.  We left all of our Pine the Natural color and just sealed with a clear varnish.  Over time it will yellow with age.  Just behind this painting is the wall for the Shower.

If you remember from a previous post we attached a reclaimed barn door to the wall for our headboard.  We sold our actual bedroom set before we left Wenatchee.  It was a Craftsman Style set but we knew we were going to want to do something a bit more rustic here.  As I type, my son John is outside working on a footboard for the bed ... also out of a reclaimed door.  I'm anxious to see it completed.  :) 


Glens side of the bed.  :)  Note the old rope handlle on the left used to close the door when it was still being used.  


This is my side.  The round paintings on the right were a Baby gift to my Mother when I was born.  They are prints by Bessie Pease Gutman for those of you that are into Antiques. Hmmm... does that make me an Antique too?  :/ 


These are the doors to our closet ... also a reclaimed door which we cut down the middle.  I love how these came out when I varnished them.  They swing back and forth like the old Saloon doors.  A nice plus when you have your hands full.  


Another one of our Barn doors.  This one goes from our Bedroom into the Bathroom.  Down in the left corner is the edge of a large Pine Dresser we have in our bedroom.  

Voila!! Guess what just got done?!  Our Footboard!


I love it!  I think it finishes the Bed off nicely. 


This is the other side of the door from the Bathroom into the back Hallway.  Note the Special K.  When the door is closed you have full access into a Pantry that is built into the wall between the studs.  When open, (as in photo), it covers 3/4 of the Pantry.  It's right around the corner from the Kitchen so very accessible.  Small means utilizing all available (and sometimes, not so available) space! 


On the very left of the photo above you can see some Trim.  That is the doorway to the 'Library' aka the second bathroom.   We've always had a guestroom and/or hallway in which to display older Family photos and tchotchkes.  Now our Guestroom is our 'RV' so no real place for some of these favorite items in there.  So, I eleceted to utilize some of the space in this bathroom.  I mean, what better place to show off your favorites then where you have a captive audience?!  :)


The Wooden boxes on the Wall we found in the Attic of the Garage that was on this property when we bought it.  The Gentlemean in the photo is Great Uncle Charlie (on Glens side).  The story is he was in a card game, there was gun play, and he wound up running across the Border into Canada for some silly reason.  :/  When you look at the photo full on you can see where Glen got his looks. ESPECIALLY the eyes!


We originally had a White Pedestal sink that was suppose to go in this Bathroom but with all the delays and drama for the first 6 months the sink wound up getting cracked somehow while in storage.  We didn't realize it until we went to install it.  Glen never liked the idea of the Pedestal Sink in there to begin with - he thought it should be a deep sink.  (See where I'm going with this?  The sink just 'happened' to get cracked)  And, as luck would have it, Bob just 'happened' to have this Stainless Steel sink he could put in instead.  So, that's what he did, and he built the Cabinet surround while at it.  He really did a nice job and I guess I have to admit, it probably is a lot more practical than the Pedestal sink in there.  I now have a place to wash my Paint brushes and Glen has a decent sink to use for whatever when he comes in from working outside.  Note the Stainless Steel Towel Bar.  I'll tell you more about that later.


This is the only door (besides the closet) that is not Barn door Style.  There is no room to the left at all and just that short wall that you can see on the right side.  No place for a barn door track.  This is a Bi-fold that Glen built to fit the space.

Has it ever happened that you have an idea and then someone comes along, takes that idea, runs with it, and then does a better job than you did?!  Well, Gina and Bob took the penny idea, and re-did the steps going up to the second floor in their home and I am so envious.  (Of course, they did learn something from our mistakes!  :)   There was carpeting that desperately needed to be replaced so off it came.  Bob had to put all new kick-plates in and new stair treads.  Gina did all the kick-plates with pennies and then they stained the stair treads to match the bannisters.  Below is the fnished product.  I thought it turned out great!  It certainly lightens the stairwell.  One more set of stairs going down to the lower level to go!


I'm going to end for today.  I have photos for the rest of the house but this will never get out if I try and fit it all in tonight.  I will try and get to the rest sometime within this coming week.

HAVE A GREAT WEEK!!

CHARLEEN


Saturday, February 7, 2015

WELL ... ITS BEEN A MONTH.

AND ... A LOT HAS BEEN ACCOMPLISHED!

Walls are all up, painted, the trim is done, the floors are stained  AND SWEPT as per instructions from the Inspector. (Is that a little power trip or what?!) That all had to be done before the Plumbing/Gas Inspector would come back for his last inspection when he would (hopefully) unlock our gas meter so we could get some real heat in the house.  

We passed.  Well, sort of.  He unlocked the meter but wants two of the 4 sink traps replaced.  Because of their positioning under cabinets, the fella's used two accordion style traps.   Evidently they are not legal in Idaho.  They sell them in Idaho but they are not legal in Idaho.  ??  How does that work?  Anyway, he said to replace them, take a photo and text it to him.  Then we are done.  Hallelujah! 


Kitchen sink is in the island.  You can see some finished/painted walls behind it.  I LOVE the sink and the faucet!  


This is our bedroom (walls finished but no trim on the windows yet) and that's Glen and Ernie attaching an old Barn door to the wall for our Headboard.  (Many coats of varnish later!) You can't see it in the photo but there is an old brass plate that says 'Private'  right in the middle behind Ernie ~ it was on the door when we rescued it :)   It has great shades of old barn red, brown, black and even some white paint on it.  There's even an old rope handle. Unfortunately, I just wasn't able to capture it in the photo.


Electricians have been back and installed 'most' of the lights.  These two are over the island. 


These three are over the kitchen stove and counter area.  


Installing Medicine cabinets in the main bathroom.  Lights are up.


Done!


Next, the cabinets.  We went with Hickory for both this bathroom and the kitchen.


Yes.  That is pennies.  This is the floor for the shower.  I did the penny work  (and, in case you are wondering ... never again!)
When Glen suggested we do the whole bathroom floor that way I 'politely' told him he was welcome to go ahead anytime and do it.  You will soon see how far that idea went!!  :)  I covered the whole thing with about 6 coats of an oil based polyurethane floor varnish, and no, it is not slippery.


The rest of the shower finished.  Those are galvanized steel panels that have been made into a shower surround.  (Thus, the industrial part of Rustic Industrial.)  :)  Bob did the majority of the work on this and he did a great job.


Cabinet above microwave is in.


We spray stained the concrete floor.  We used two coats of a white-wash stain, two coats of a midnight slate gray and 3 coats of a high gloss varnish (which turned out to be not really high gloss).  They suggest you use a weed sprayer to do it, which we did.  That takes some practice   :/  We practiced in our closet.  We won't be giving tours of the closet.


A close-up of the floor.

For the most part, the floor actually turned out great.  Well, lets say it has its own personality.  But when you realize we had no idea what we were doing when we started the project it's not too shabby.  The floor catches everyone because they are not sure what it is when they first see it.  (PLEASE NOTE: no pennies :)


Bob and Ernie working on putting in the 'mudroom/coat rack' area.  If you go back and look at the photo of the kitchen sink, this is on the wall that you see just beyond the sink (with the rag stuffed in the electrical hole).  :/


This is our grandson Sean, taking a break and having lunch up in the small loft above our bedroom.  He has claimed this as 'his room' when he comes up and visits.  :)

These photos have been waiting for me to do something with them but I have been VERY busy packing, and now, unpacking..  Two weeks ago tomorrow we moved.into the house.  No, everything is not done, but it is livable.  As soon as I get the rest of the photos re-sized, etc. I will be doing another Blog and can show you the progress we have made just in the last several weeks.  

Unfinished or not, it feels great to finally be in the house!

See you soon!